Pack Designer
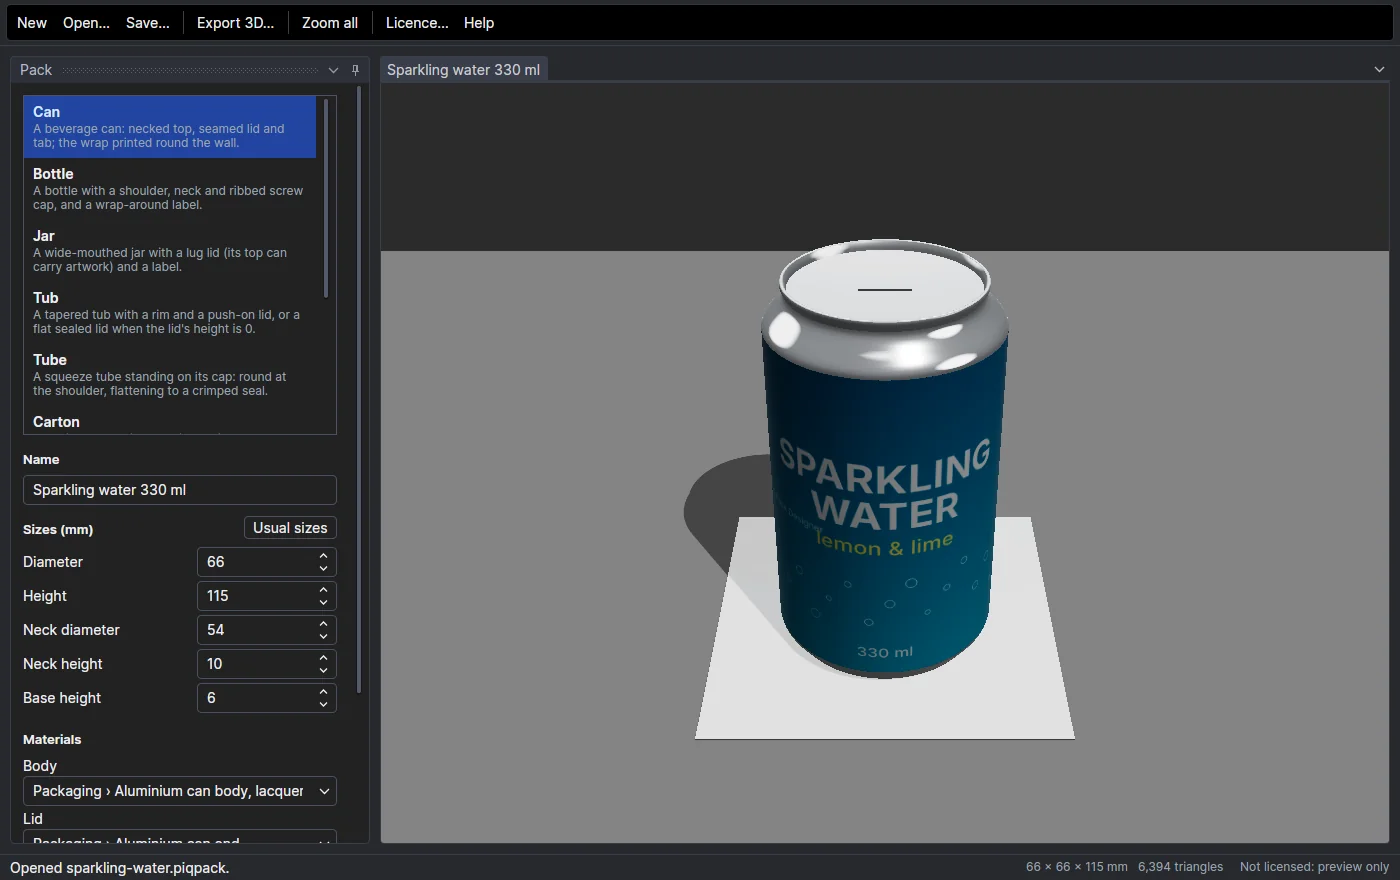
The ParametrIQ Pack Designer makes 3D models of the packs a product comes in - cans, bottles, jars, tubs, tubes,
cartons, stand-up pouches, crisp packets and sachets - from their sizes, in ParametrIQ's materials, with your artwork
printed on them. You see each pack in ParametrIQ's 3D view as you change it, and export it in the 3D formats
ParametrIQ CAD uses, ready to place as the product in a carton or tray or to show on a
retail shelf. It is a separate, free program (PiQ.Pack.App).
Getting the Pack Designer
The Pack Designer is free: it needs a ParametrIQ account and its own licence, which costs nothing.
- Sign up or sign in at parametriq.co.uk and open Account › Licenses.
- Under ParametrIQ Pack Designer, click Get my free licence. The licence is listed with its Product key, which is emailed to you too. The licence covers every version.
- Click its Download button, and install the Pack Designer.
- Start the Pack Designer. Its splash screen shows while it checks the licence and reads the materials, then the Pack Designer licence window opens: enter your account's E-mail and Password (or tick I sign in with Google or Facebook) and the Product key, and click Activate.
As with ParametrIQ CAD, the licence can be activated on two computers at once; with both taken, the window lists them so you can remove one. The Pack Designer checks the licence each time it starts and runs for up to seven days without reaching the licence server. Until it is activated you can design and preview packs, but not save or export them. The licence button at the top right (your e-mail, or Not signed in) or Help › Licence… shows the licence, or deactivates this computer. The title bar and menus are the free apps' (see What they share).
The packs
Choose the kind of pack in the list at the top of the Pack panel. Choosing another kind starts it at its usual sizes.
| Pack | Sizes it asks for | Materials | Artwork |
|---|---|---|---|
| Can | Diameter, height, neck diameter and height, base height | Body, lid | Wrap |
| Bottle | Diameter, height, shoulder, neck and cap sizes, label height and position | Bottle, cap, label | Label |
| Jar | Diameter, height, neck, shoulder, lid diameter and height, label height and position | Jar, lid, label | Label, lid top |
| Tub | Top and bottom diameters, height, rim width, lid height | Tub, lid | Wrap, lid top |
| Tube | Diameter, length, cap diameter and height, shoulder, seal height | Tube, cap | Wrap |
| Carton | Width, depth, height | Board | Sides, top |
| Stand-up pouch | Width, height, gusset depth, side and top seals | Film | Front, back |
| Crisp packet | Width, height, fill (thickness), end seals | Film | Front, back |
| Sachet | Width, height, fill (thickness), seal width | Film | Front, back |
A tub with a lid height of 0 is sealed with a flat lid across its rim. A tube stands on its cap, as it does on a shelf.
Sizes
Sizes are in millimetres. Each is kept within the range that kind of pack can take, and sizes that don't fit together are made to: a neck wider than the body is made the body's width, a label above the shoulder is stopped below it, a shoulder and neck too tall for a short bottle are shortened. Usual sizes puts every size back to its kind's usual one. The status bar shows the pack's overall size.
Materials
Each part of a pack is made of one of ParametrIQ's appearances, the same ones the 3D page
uses: the Packaging group has can bodies and ends, tinplate, container glass (flint, amber, green), PET, HDPE and
polypropylene, label papers and films, tube laminate, metallised and foil films, and kraft. Each material first lists
the groups that suit it; tick Show every material to choose from all of them. Appearances you add to the
Appearances folder of your Extensions folder are offered too.
Artwork
Each pack has the artwork places shown in the table above. Choose… picks an image (PNG, JPEG, WebP, a Photoshop document, Illustrator, PDF, EPS or SVG artwork …) and Clear takes it off. The image is stretched over the place it is printed on, so make it the proportions shown under it (Printed at … mm); Template… saves an SVG of exactly that size to draw on, its panels marked, or a Photoshop document (see Round trip with Photoshop).
- A wrap or label goes all the way round: its middle faces the front and its two ends meet at the back.
- A carton's sides are one strip: front, right side, back, left side, left to right. Its top is seen from the front, its top edge at the back.
- A lid top is seen from above, the top of the image at the back.
- A film pack's front and back each fill that face, seal to seal.
Where the image is see-through, the material shows. On metal (a can, a metallised film) the print has a white base under it, so less of the metal shows through.
Vector artwork - an Illustrator file (saved with Create PDF Compatible File on, as Illustrator does unless told not to), a PDF, an EPS or an SVG - is drawn from its page (the artboard), stretched over its place the same way; where nothing is drawn, the material shows. The preview draws it 2,048 pixels along its longer side, and a print draws it again at the print's resolution, so it stays sharp. A PDF's first page is the artwork. Artwork from CorelDRAW, Affinity or Canva works the same way saved as PDF or SVG.
Shrink sleeves
A bottle's or jar's label, or a can's or tub's wrap, can be a shrink sleeve: a tube of film printed flat, slid over the pack and shrunk on with heat, so it takes the pack's shape - over the shoulder and up the neck. Tick Make it a shrink sleeve under Shrink sleeve. On a bottle or jar the sleeve runs up from Label above the base for Label height, as far as the cap or lid; on a can it covers the wall and the neck; on a tub, its side.
The film shrinks most where the pack is narrowest, so artwork printed as it should look would come out squeezed on the shoulder. Draw the artwork as it should look on the pack instead, and the Pack Designer works out the print that shrinks into it (reverse distortion):
- Under Artwork, click the sleeve's Template…. The SVG is the pack unrolled at its true size, as wide as its widest girth and as tall as the sleeve's length up its side, with a 10 mm grid. The red outline is the pack: where it is narrower (the neck), only the middle of the row is on it.
- Draw the artwork on it as it should look on the pack, its middle the front, and choose it as the sleeve's artwork. The preview shows it on the pack.
- Click Save print…. The print is a PNG at 300 dpi with its size in it: the sleeve's girth flat, by its length before shrinking, its left and right edges the back seam. Tick With a distortion grid to draw the pack's 10 mm squares on it as they print, to check a proof.
| Setting | What it is |
|---|---|
| Lay-flat width | Half the sleeve's girth, flat (mm). 0 makes it 5% over the pack's widest girth. |
| Shrink along its length | How much the film shrinks up the pack (%, machine direction): the print is that much longer. |
| Film's most shrink across | The most the film can shrink round the pack (%, transverse direction): PETG about 75, PVC 60, PE 40. |
| Its artwork is drawn | As it looks on the pack (the print is made from it), or As printed, before shrinking (the preview shows how a print you already have shrinks on). |
Under the settings the Pack Designer gives the sleeve's size, how much it shrinks across and along, and where it can't work: a sleeve smaller than the pack won't go on, film asked to shrink more than it can won't reach the pack, and a sleeve that shrinks under 2% may sit loose. The shrink is taken as even round each girth and along the length, as sleeve films mostly behave; check the first run against the distortion grid.
Round trip with Photoshop
To keep the artwork in Photoshop and the distortion in the Pack Designer, work with Photoshop documents (PSD):
- Click the artwork's Template… and save it as a Photoshop document (PSD). It is the artwork's size at 300 dpi, with three layers: Artwork (edit this layer), holding the artwork the pack has now, and two hidden guides, Pack outline and 10 mm grid (another artwork's template has Edge and panels). The Pack Designer makes the PSD the pack's artwork.
- Open it in Photoshop and draw on the artwork layer (add layers of your own as you like). Turn the guides on to place things, and off again before you save. Keep Maximize Compatibility on, so the file holds the picture as it looks.
- Save. The Pack Designer sees the file change and shows it on the pack; it reads the picture Photoshop saved, so your layers, effects and text all count. If the guides were left showing, it says so.
- Click Save print… and choose Photoshop document (PSD): the print is a layer, Print, with the Distortion grid as a hidden guide layer over it, to check the proof in Photoshop. The print is made from the artwork at its full size.
The distortion is always worked out again from the PSD you edit, so the print and the pack always agree. PSD files are read in RGB, greyscale, indexed or CMYK (CMYK converted simply, without its colour profile); large documents (PSB) are not read.
Exporting
Export 3D… writes the pack in any of ParametrIQ CAD's 3D formats: glTF (.glb, .gltf), Wavefront OBJ, STL,
COLLADA (.dae, .zae), USDZ, PRC and U3D. Each part is its own named part with its material and its artwork, and the
pack stands on its base, facing the front. In ParametrIQ CAD, choose 3D › Models and Products › Place Product… and
pick the exported file to put the pack in your carton, tray or insert and check it fits.
Packing it
Pack These… on the toolbar hands the pack to ParametrIQ CAD's New from Product: CAD opens (if it is installed) on the ways the products can stand in a case, each with a fitment and an outer chosen from its library, and makes the finished drawing. The pack needn't be saved first. If ParametrIQ CAD isn't found beside the Pack Designer or where it is installed, the status bar says so.
Pack files
Save… keeps a pack as a .piqpack file: its kind, name, sizes, materials, artwork and shrink sleeve (images in the same folder
or below it are kept relative, so the folder can be moved). Open… opens one again. The files are JSON:
{
  "kind": "Can",
  "name": "Sparkling water 330 ml",
  "sizes": { "Diameter": 66, "Height": 115 },
  "materials": { "Body": "can-aluminium", "Lid": "can-end-aluminium" },
  "artwork": { "Wrap": "sparkling-water-wrap.png" }
}
Sizes and materials a file leaves out are the kind's usual ones. The Pack Designer comes with samples in its Samples
folder. To open a pack, or start with a kind, when it starts:
PiQ.Pack.App sparkling-water.piqpack
PiQ.Pack.App --kind CrispPacket