Bridge or Tab Tool
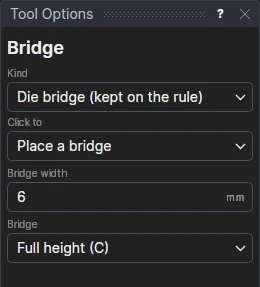
Use the Bridge or Tab Tool to leave a part held where you click on a cut. It has two Kinds: a die bridge, kept on the rule for the die-maker (the rule stays whole in the drawing; Make Die, CF2 and DDES3 leave it uncut), or a gap in the cut (a tab, or micro-joint: the cut itself is split round it, so every export - DXF, G-code, HPGL, SVG - cuts round it). Its button is Bridge for packaging, labels and leather (die-cut trades) and Tab for laser cutting, sign making, gaskets and foam.
Which kind for which trade
| Kind | The trade's own tool | A drawing for |
|---|---|---|
| Die bridge (kept on the rule) | Bridge Tool | packaging, laser cutting, labels, gaskets, foam, leather |
| Gap in the cut (tab) | Tab Tool | laser cutting, sign making, gaskets, foam |
A drawing for one industry starts with its trade's kind, and the toolbar button has that kind's name; a General drawing (or Show All Tools) shows the button as the Bridge or Tab tool. The kind you choose stays chosen for that drawing until you choose another. The Tool menu still lists each trade's tool by its own name. Each kind makes what its trade's tool always has made: the same lines, layers and variables.
Choose the kind for the machine that cuts it: a die bridge does nothing on a laser or a plotter, which cut the whole rule; a tab is cut round by every machine, a die-maker included.
Bridge Tool
Use the Bridge Tool to put bridges (nicks) on the rules of a die where you want them: the stretches of rule left uncut in the die board so the board holds together. Make Die bridges a die automatically; bridges you place on a rule are kept where you put them. It is a tool of packaging, laser cutting, labels, gaskets, foam and leather.
Choose what a click on a rule does with Click to, then click on a rule (a line, arc or curve; the rule under the pointer is lit, and the bridges are shown before you click). The drawing shows each rule's bridges as gaps in it, as Make Die leaves them uncut.
Place a bridge
- Fill in the Bridge width.
- Choose the Bridge: Full height (C), or a tack: the rule notched on its left (L), right (R) or both sides (D).
- Click on a rule where the bridge goes. Click again for more.
The bridge keeps its place along the rule as a share of its length (a quarter of the way along stays a quarter of the way along when the rule is resized). The width becomes a variable (BRW1) for every bridge on that rule; change it and they all change.
Spread bridges
- Fill in the Bridge width, and either the number of Bridges or (with 0 bridges) the Bridge spacing, the furthest apart they are.
- To set the first and last bridge a distance from the rule's ends, fill in Bridges from the ends; to double each bridge, the Double bridge gap between the two.
- Click on a rule.
The rule keeps these settings, not the bridges' places: when the rule gets longer, a spacing gives it more bridges. Each size becomes a variable.
Clear bridges
Click on a rule to take its bridges off, or select rules and choose Production › Clear Bridges (nothing selected: every rule), or Clear Bridges in the Properties panel, which also says what bridges the selected rules have. Make Die then bridges them automatically again.
Where bridges go
Make Die cuts the bridges into the die board (with Keep automatic bridges too, it also bridges the rules that have none of their own). The bridges are written to DDES3 files where they are, with their style; CF2 files keep each rule's number of bridges and their width. The drawing API lists each element's bridges.
In a drawing, a rule's bridges are its RULE settings: PLACED (each bridge's style, place and width),
BRIDGEWIDTH, BRIDGESPACING, BRIDGEENDS and BRIDGEPAIR (see
Element settings).
See also: Make Die, Edge Notch Tool, Tear Strip Tool.
Tab Tool
Use the Tab Tool to leave tabs (micro-joints) in a cut: short stretches left uncut, so a part stays held in the sheet while the rest is cut, and is snapped out afterwards. A tab also stops a small part dropping through the slats of a laser bed.
Usage
- Fill in the tab's Width: how much of the cut is left uncut. It can be a number or any expression.
- Click a cut where a tab goes: the line, arc or curve under the pointer is highlighted as you move, with the tab's place shown on it. The gap is centred on the click.
- Click again for the next tab, on the same cut or another.
Tabs that follow the drawing
The cut is split either side of the tab, as the Split Tool splits it, and the piece between is
taken out: the points either side of the gap are defined on the cut, a fraction of the way along it
(0.25*LENGTHOF(@5)-TAB1/2), so the tab keeps its place as the cut changes size. The cut itself is kept on the
Construction layer, with its pieces defined on it.
The width is kept in a new variable (TAB1), and the Width box then shows TAB1, so the tabs you put in after it share it: change TAB1 and every tab changes. Type a number in the box to start a new variable for the next tabs.
Tabs and bridges
A cut's Bridges (see Element settings) are a die-maker's gaps, spread evenly along a rule when the die is made. A tab is a gap where you put it, in the drawing itself: every export (DXF, G-code, HPGL, SVG) cuts round it.
To allow for the beam's kerf, offset the cuts by half of it with the Offset Tool.