Raster Image Tool
Use the Raster Image Tool to place a picture, such as a photograph, scan or logo, in the drawing. The picture is pinned to four corner points, so it moves, turns and stretches when they move. It is saved inside the drawing, or linked to its file.
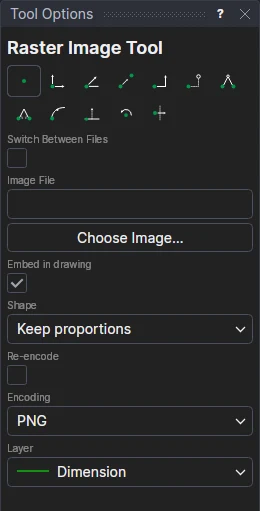
Usage
- Click Choose Image… and pick a PNG, JPEG, WebP, Photoshop (PSD), BMP or GIF file, or type the file's path in Image File.
You can type or paste a web address (
https://…) instead: it is fetched, and placed once it arrives. - Choose its shape:
- Keep proportions: click* the bottom left corner, then the bottom right corner. The height comes from the picture's own proportions. The bottom edge can be at any angle.
- Rectangle: click* the bottom left and bottom right corners, then a point level with the top.
- Free: click* each corner in turn (bottom left, bottom right, top right, top left), to skew the picture or put it in perspective.
- Choose how it is stored:
- PNG, JPEG and WebP files are saved as they are. Other files are converted to the Encoding chosen; a Photoshop document is placed as it looks, all its layers together.
- Tick Re-encode to convert PNG, JPEG and WebP files too, for example to make a large PNG smaller as WebP.
- Quality (1–100) appears for the lossy encodings (WebP lossy and JPEG). Lower makes a smaller file.
- Choose the layer to put the picture on.
- Leave Embed in drawing ticked to keep the picture inside the drawing (it then needs no other file), or clear it to link the picture to its file or web address: the drawing then reads it whenever it is opened, so changing the file changes the drawing. A linked picture is shown as its file is (the encoding settings don't apply). Your choice is remembered. See Linked files and web addresses.
The picture is shown as you place it. For Keep proportions and Rectangle, the corners you don't click are added as new points worked out from the ones you do, so the picture keeps its shape when the bottom corners move.
Switching between images
To show one of several pictures depending on a variable (a different logo for each customer, say), tick Switch Between Files:
In Switch On (a variable or expression), type the variable (or any expression) that picks the picture:
CUSTOMER.In Cases (one per line: value: file), list the pictures, a line each: the value the picture is shown for, a colon, then the file. Each Choose Image… adds a line, numbered after the others. A
DEFAULT:line is shown for any other value.1: C:\Logos\acme.png 2: C:\Logos\globex.jpg DEFAULT: C:\Logos\plain.pngPlace it as above. The one shown as you place it is the one the variable picks now, and its proportions set the corners for Keep proportions; the others are fitted to the same corners. Each is stored as Encoding and Re-encode say.
They are placed together as one SWITCHPART on the same corners. Change the variable and the other picture is shown in its place; only the one shown is exported.
To turn a placed picture (a logo, say) into curves you can cut, use the Trace Tool: it traces closed splines round each of its colours, and they follow the picture's corners.
*Depending on the chosen snap mode, several clicks may be required to define the point parametrically. Read more about Snap Modes
See also: RASTERIMAGE, SWITCHPART, Barcode Tool, Trace Tool.