Allowance Tool
Use the Allowance Tool to draw a line a distance outside or inside a closed outline you click, the way your trade needs it: a seam allowance round a pattern piece, an edge allowance round a glass or stone panel, a routing inset inside a sign, or a V-groove round a mount's aperture. Each is an offset of the outline, so it follows it. Choose with Kind; the button has your trade's name: Seam Allowance (sewing, leather), Edge Allowance (glass, stone), Routing Inset (sign making, laser cutting, carpentry), V-Groove (picture framing).
Which kind for which trade
| Kind | The trade's own tool | A drawing for |
|---|---|---|
| Seam allowance | Seam Allowance Tool | sewing, leather |
| Edge allowance | Edge Allowance Tool | glass, stone and tile |
| Routing inset | Routing Inset Tool | sign making, laser cutting, carpentry |
| V-groove | V-Groove Tool | picture framing |
A drawing for one industry starts with its trade's kind, and the toolbar button has that kind's name; a General drawing (or Show All Tools) shows the button as the Allowance tool. The kind you choose stays chosen for that drawing until you choose another. The Tool menu still lists each trade's tool by its own name. Each kind makes what its trade's tool always has made: the same lines, layers and variables.
Seam Allowance Tool
Use the Seam Allowance Tool to add a seam allowance round a pattern piece: draw the piece as it is sewn (its sewing line), click it, and the cutting line is drawn the allowance outside it.
Usage
- Fill in the Seam Allowance.
- Choose the Corners: Mitred (the allowance's sides carried on to a point, the usual corner), Squared off (carried on no further than the allowance, then cut across: no long points at sharp corners), or Rounded.
- Leave Make The Outline The Sewing Line ticked to move the outline to layer 4 (dashed), as the patterns in Run Parametric's Sewing folder have it.
- Choose the layer for the allowance: the cutting line, usually Cut.
- Click the piece's outline. A line that isn't closed (one edge) gets its allowance on the side you click. The allowance is shown as you move.
An allowance that follows the drawing
The allowance is an OFFSET of the outline, written with its corners
(OFFSET @7,@3,-SA1,0,CORNERS="MITRE"), so it follows the outline as you change the piece. The allowance is kept in a
new variable (SA1), and the box then shows it, so the next pieces share it: change SA1 and every
piece's allowance changes.
See also: Notch Tool, Grain Line Tool, Dart Tool.
Edge Allowance Tool
Use the Edge Allowance Tool to draw a glass or stone panel's cutting size from its finished size: the outline grown by the allowance that the edge work (arrissing, grinding, polishing) takes back off - or shrunk, for an undersize to fit an opening.
Usage
- Draw the panel's finished outline as one closed element.
- Choose the Cut size: Oversize (to grind) or Undersize.
- Fill in the Allowance: how much bigger (or smaller) all round.
- Choose the Layer for the cutting size, and tick Finished size to the Dimension layer to move the finished outline there: a size to check, not cut.
- Click the finished outline. The cutting size is shown as you move over it.
The cutting size is an OFFSET of the finished outline, the allowance a variable (GRIND1) shared by the next panels: change it and every panel's cutting size follows.
See also: Corners Tool, Glass.
Routing Inset Tool
Use the Routing Inset Tool for a border routed or V-carved a distance in from the edge of a sign, a plaque or a panel, or for the line a sign's face is cut back to.
Usage
- Fill in the Routing inset: how far in from the edge the border runs.
- Turn on Round corners to round the border's corners to the Routing corner radius (as a router bit leaves an inside corner, or for the look); off, its corners follow the shape's, sharp where they are sharp.
- Click a closed shape (the sign's outline).
The border goes on the Route layer (added if the drawing hasn't one). Set the layer's router bit, depth and feed in Production › Tool Options.
A border that follows the shape
The border is an OFFSET of the shape, so it follows it. With round corners the shape is offset in by the inset and the radius (that offset kept on the Construction layer) and offset out again by the radius, which rounds every corner. The sizes are kept in new variables (RINS1, RRAD1), and the boxes then show them, so the next borders you make share them: change one and every borders changes. Type a number in a box to start a new variable.
See also: Offset Tool, Fixing Holes Tool, Sign making.
V-Groove Tool
Use the V-Groove Tool for a V-groove round a mount's aperture: a decorative line cut into the face of the mount a little way out from the window.
Usage
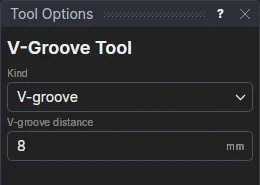
- Fill in the V-groove distance: how far outside the aperture the groove runs.
- Click the aperture (a closed shape: made with the Mount Aperture Tool, or an oval).
Round a straight-sided aperture the groove's corners stay square, each the distance out from both sides; round an oval or a circle it is an OFFSET of it. It goes on the V-cut layer.
A groove that follows the aperture
The groove is on the aperture's corners (or the aperture itself) and the distance, kept in a new variable, VG1, that the next grooves share.
See also: Multi-Aperture Mount Tool, Picture framing.