Flap or Seam Tool
Use the Flap or Seam Tool to add a strip on a straight edge, folded along it: a carton's glue flap, or a sheet-metal seam's or hem's allowance. Both are the same shape - a width out from the edge, its ends cut in at an angle, set back from the edge's ends - so they are one tool with two Kinds. Its button is Glue Flap for packaging and Seam and Hem for sheet metal and HVAC.
Which kind for which trade
| Kind | The trade's own tool | A drawing for |
|---|---|---|
| Glue flap | Glue Flap Tool | packaging |
| Seam or hem | Seam and Hem Tool | HVAC, sheet metal |
A drawing for one industry starts with its trade's kind, and the toolbar button has that kind's name; a General drawing (or Show All Tools) shows the button as the Flap or Seam tool. The kind you choose stays chosen for that drawing until you choose another. The Tool menu still lists each trade's tool by its own name. Each kind makes what its trade's tool always has made: the same lines, layers and variables.
Glue Flap Tool
Use the Glue Flap Tool to add a glue flap (the manufacturer's joint) on the edge of a carton's or case's end panel: the edge becomes the flap's fold, and the flap's two ends are cut in at an angle so it clears the end flaps when the carton is glued and set up. It is a tool of the packaging trade.
Usage
- Fill in the Glue Flap Width (how far the flap reaches beyond the fold: 12 to 15 mm on a folding carton, 30 to 35 mm on a corrugated case).
- Fill in the Start Angle and End Angle: how far each end leans in from square, in degrees (15 is usual; 0 is square). The start is the end of the edge it was drawn from.
- Fill in the Set-Back: how far the fold starts in from each end of the edge, so the flap doesn't foul the flaps at the panel's ends (0 for none). The edge is cut there.
- Choose the layer to cut on (the Cut layer, to start with).
- Click the edge, on the side the flap goes. The line under the pointer is lit, and the flap shown, as you move. It must be a straight line (a line segment); a side of a polyline can be made one with the Explode Tool.
Click another edge to add another flap.
What it draws
The edge is kept on the Construction layer, and in its place are drawn the fold, on the Crease layer (if the drawing has one; else the edge's own layer), the flap's outline (its two ends and its far edge) on the layer chosen, and, with a set-back, the short cuts along the edge from its ends to the fold's. If the two ends would cross before the far edge, the flap is made only as wide as fits.
It follows the drawing
The width, the two angles and the set-back are kept in new labelled variables (GFW1, GFA1, GFB1, GFS1), and the flap is drawn by a block on the edge's two ends: move them, or change a variable, and the flap follows. The next flap shares the same variables (they are put in the options); type a number to start new ones.
See also: Tuck Flap, Dust Flap, Panel, Packaging.
Seam and Hem Tool
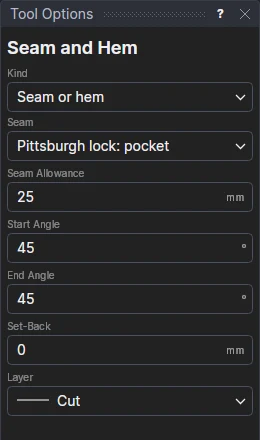
Use the Seam and Hem Tool to add a seam's or hem's allowance on an edge of a flat pattern: a duct's Pittsburgh or snap lock, the edge turned for an S-slip or drive cleat, a standing seam, or a hem. The edge becomes the fold, the allowance is added beyond it, and its ends are notched so the folds clear each other at the corners. It is a tool of the HVAC and sheet metal trades.
Usage
Choose the Seam. Each starts the Seam Allowance at a usual width for 0.5 to 0.8 mm (26 to 22 gauge) galvanised duct:
Seam Allowance Pittsburgh lock: pocket 25 mm (1 in) Pittsburgh lock: flange 6 mm (¼ in) Snap lock: pocket 22 mm (⅞ in) Snap lock: flange 12 mm (½ in) Slip and drive edge 12 mm (½ in) Standing seam 25 mm (1 in) Hem 12 mm (½ in) Set the allowance to suit your roll former or folder, and the sheet's thickness; choose Other to keep the width you type.
Fill in the Start Angle and End Angle: how far each end of the allowance leans in from square, in degrees. 45 notches the corner (the duct notch) so the folds clear each other; 0 is square (a hem starts at 0).
Fill in the Set-Back: how far the fold starts in from each end of the edge (0 for none); the edge is cut there.
Choose the layer to cut on (the Cut layer, to start with).
Click the edge, on the side the allowance goes. It must be a straight line (a line segment).
What it draws
The edge is kept on the Construction layer, and in its place the fold is drawn on the Crease layer (if the drawing
has one; else the edge's own layer), and the allowance's outline on the layer chosen. For a hem, the allowance is the
length folded back; bend it 180° on the fold (see Bend Line for a note of the bend): a note
UP 180° R0.2 makes a closed hem, UP 180° R2 an open one, UP 200° R2 a teardrop, folded so in 3D and STEP (see
Hems).
It follows the drawing
The width, angles and set-back are kept in new labelled variables (SHW1, SHA1, SHB1, SHS1), and the allowance is drawn by a block on the edge's two ends: move them, or change a variable, and it follows. The next allowance shares the same variables.
See also: Flat Pattern, Corner Relief, HVAC.