Mate Tool
Use the Mate Tool to place a mate: where a part meets another, so that on the 3D page a lid can be put on its box, a tray in its sleeve, or a laser-cut side on its base, once they are made (Assembling parts in 3D). A mate is a place and a direction on a panel or a solid; one mate can go to another, face to face or inside it. It is drawn as a small ring and an arrow, and is never cut, creased or exported.
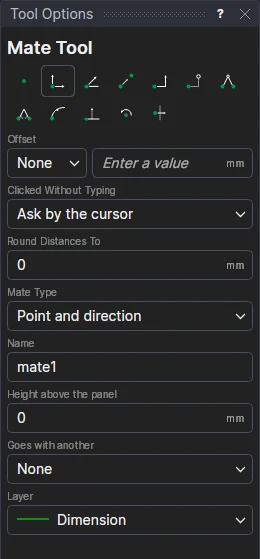
Usage
- Choose the Mate Type:
- Point and direction: mark its point, then click the way it points.
- Point and angle: mark its point; the way it points is the Angle in the options.
- Three points: mark its place, a point the way it points, and a third point on its inside's side (the three run anticlockwise from it). Folded, the points can be on different panels: three corners of a rim.
- Give it a Name, for other mates to go to. A new one is filled in (mate1, mate2 …); it can't be another mate's.
- Fill in its Height above the panel, on the panel's inside (the side the box closes round):
0on the panel, the depth of a box for its rim. On a solid (a board, a plate), its height above the solid's underside as drawn:Tits top face. It is an expression, so it can follow the sizes (D). - Choose how it Goes with another:
- None: a mate others are put to (a box's rim).
- Facing: its part is put with the other's face to face, their insides facing (a lid on a box):
TO. - Inside: its part is put inside the other's, their insides the same way (a tray in a sleeve):
IN.
- With Facing or Inside: choose the mate it Goes to (the drawing's mates are listed as you type; a mate
still to be drawn can be typed), and the Gap between them, usually the board's thickness
T(filled in if the drawing has it), so the parts touch rather than overlap; the Turn (degrees) its part is turned about the other mate's direction once on it (90stands a side up on its base's edge); and the Assembly step, when it is put there (1 first; empty: after those, in the drawing's order). - Choose the layer: a layer that isn't cut (the Dimension layer, which it starts on).
- Mark* the mate's point, on a panel. The mate is shown as you move.
- Click the way it points (or mark the other two points, for three points). The mate is shown pointing that way.
The mate is made in one step: Undo takes it away. The next one is given a new name.
It follows the drawing
The mate is on the points you marked. With Point and direction, clicking an existing point for its direction
makes the angle follow the two points (RTOD(ANGLE(P5-P4))), so it still points that way if they move; clicking
anywhere else keeps the angle clicked, as a number. Its height and gap are expressions, so they can use the
drawing's variables.
The mate is written to the drawing as a MATE command, which can also be typed in the Interactive window or edited in the drawing's text.
When it can't
A message explains why no mate was made: it has no name, or another mate's; it goes with another but no mate is chosen, or it goes to itself; an expression can't be read; the three points aren't three different points. A mate whose point isn't on a panel, or whose mate isn't there, is said on the 3D page.
*Depending on the chosen snap mode, several clicks may be required to define the point parametrically. Read more about Snap Modes
See also: MATE, Assembling parts in 3D, Panel Tool, Pages.