Rectangle to Round Tool
Use the Rectangle to Round Tool to draw the flat pattern of a rectangle-to-round (square-to-round) transition in one piece, developed by triangulation, to cut from sheet and bend. It joins a rectangular duct to a round one, the round centred over the rectangle or set off to one side. It is a tool of the HVAC and sheet-metal trades.
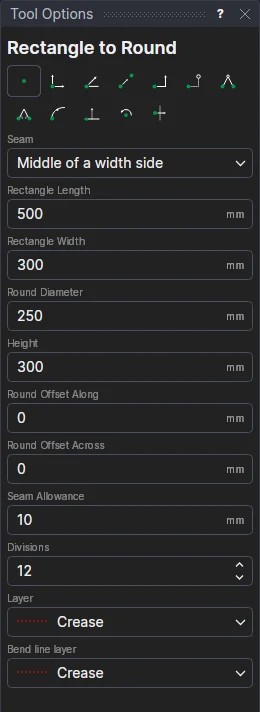
Usage
- Choose where the Seam goes: down the Middle of a width side (an end), down the Middle of a length side, or Along a corner bend (from a corner of the rectangle to the round).
- Fill in the Rectangle Length and Rectangle Width, the Round Diameter and the Height (between the
rectangle and the round). The pattern is developed on the sizes as typed: for a thick sheet type the mean sizes
(inside plus the thickness, e.g.
500+Tin a drawing with a thickness T). - Fill in the Round Offset Along and Round Offset Across: how far the round's centre is from the rectangle's, along its length and across its width (0 and 0 for a concentric transition). The round's centre is kept over the rectangle.
- Fill in the Seam Allowance: a lap added beyond the closing edge, folded on its line (0 for none, for a butt weld).
- Set the number of Divisions each quarter of the round is divided into (12 to start with).
- Choose the layer to cut on and the Bend line layer (the Crease layer, if the drawing has one).
- Click* where the seam meets the rectangle, then a point along the seam towards the round. The pattern's outline is shown as you move; it is laid out to the right of the seam.
How it is developed
The fitting is four flat triangles and four corner cones. Each triangle has a side of the rectangle as its base and its apex where that side's plane touches the round (at the round's quarter points); each cone fans from a corner of the rectangle to the quarter of the round between two of those points, divided into the number of divisions. The lines from a corner to the points on the round are the rulings. Each ruling's true length is worked out from its length in plan and the height (√(plan² + height²)), and the triangles between the rulings are laid down flat one after another, each from its three true sides, sharing a side with the last. The pattern's bottom edge is made of the rectangle's sides, its top edge of the chords of the round.
The rulings from each corner to its two quarter points are the main bends; they and every other ruling of the fans (lighter brake lines, to form the cones) go on the bend line layer, with the seam allowance's fold. The pattern is the same as the library's Square to round transition design (File › Run Parametric…, HVAC folder) draws for the same sizes.
Worked example
A 500 × 300 rectangle to a Ø250 round, 300 high, concentric, with the seam down the middle of a 300 end: the seam's true length is √((250 − 125)² + 300²) = 325, and each main bend from a corner to its nearest quarter point is √(125² + 150² + 300²) ≈ 357.9 long. The pattern's bottom edge is the rectangle's perimeter (1600), its top edge the round's circumference (≈ 785 in 48 chords).
It follows the drawing
The sizes, offsets and seam allowance are kept in new labelled variables (RTL1, RTW1, RTD1, RTH1, RTX1, RTY1, RTA1), and the pattern is drawn by a block on the two points you marked: change a variable, or move a point, and it is developed again.
*Depending on the chosen snap mode, several clicks may be required to define the point parametrically. Read more about Snap Modes
See also: Reducer, Elbow Gores, HVAC, Sheet Metal.
In 3D
A 3D page shows the pattern bent along its rulings into the transition, its seam closed (Wrapping and sweeping).