Lock Tab and Slot Tool
Use the Lock Tab and Slot Tool to add a locking tab on a flap's edge and the slot it locks into on another panel, as on crash-lock and tuck-lock cartons, self-locking trays and corrugated mailers: when the carton is set up, the flap folds over, its tab goes through the slot, and the tab's shoulders catch behind the slot's edges. It is a tool of the packaging trade.
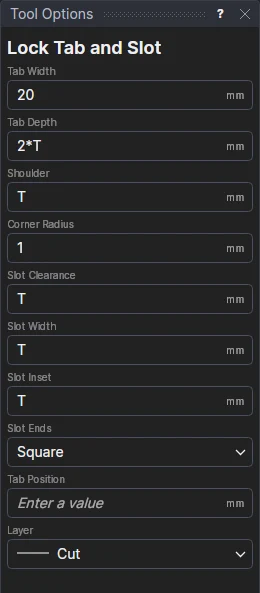
Usage
- Fill in the sizes (each starts on the board's thickness T, if the drawing has that variable):
- Tab Width: the tab's width at its root (its neck).
- Tab Depth: how far the tab reaches beyond the flap's edge (2T to start with): more than the board's thickness, so it goes through the slot.
- Shoulder: how far the tab's head stands out each side of its neck. The head starts the slot's width out from the edge (where the tab comes through the board) so the shoulders catch behind the slot. 0 makes a plain tab, as the library's self-locking tray and pizza box have.
- Corner Radius: the radius of the tab's two far corners, to ease it into the slot (0 for square corners).
- Slot Clearance: how much longer the slot is than the tab's neck (about T).
- Slot Width: the slot's width across (about T).
- Slot Inset: how far the slot is set in from the line you click for it, into its panel (0: the slot starts on the line).
- Slot Ends: Square (a rectangle) or Rounded (a half circle the slot's width across at each end, as the Slot tool draws a slot): rounded ends tear the board less when the tab is pushed through.
- Tab Position: where the tab's centre is along the flap's edge, as a fraction of its length (0.5 for the middle). Leave it empty to put the tab where you click the edge.
- Choose the layer to cut on (the Cut layer, to start with).
- Click the flap's edge, on the side the tab goes (out from the flap). It must be a straight line (a line segment).
- Click the line on the panel the tab locks into, on the side the slot goes: the crease the flap folds onto, or the panel's edge. The slot is put across from the tab: the tab's centre brought square onto that line. Esc starts again from the first click.
The tab and the slot are shown as you move the pointer, before each click.
What it draws
The flap's edge is kept on the Construction layer, and in its place, on the layer chosen, are drawn the edge either side of the tab and the tab's outline: its neck, its shoulders, its head with the rounded corners. The slot is a rectangle cut on the same layer, the slot width across and the tab's width plus the clearance long; with rounded ends, its two ends are half circles inside that length (it is as long, overall, as a square one). The line clicked for the slot is left as it is.
It follows the drawing
The sizes are kept in new labelled variables (LKW1 the tab's width, LKD1 its depth, LKS1 the shoulder, LKR1 the radius, LKC1 the clearance, LKG1 the slot's width, LKI1 its inset, and LKP1 the position when you type one); a size typed as a variable of the drawing's, such as T, is used as it is, so the tab and the slot follow the material chosen. The next tabs share the variables, so changing one changes them all. Both are drawn by one block on the two lines' ends, so they follow the lines too: lengthen the flap and the tab stays at its fraction of the edge, and its slot stays across from it. A shoulder or radius too big for the tab is made as big as fits.
Worked example
A self-locking tray in B flute (T = 3): its rolled-in end wall's free edge carries two tabs that lock into slots in the bottom, a few millimetres in from the crease between the bottom and the end wall.
- Leave the sizes as they start: a 2T deep tab with T shoulders, a slot T wide, T longer than the tab's neck and T in from the crease.
- Type 20 for the Tab Width and 0.25 for the Tab Position, click the end wall's free edge on its outer side, then the crease, on the bottom's side.
- Type 0.75 for the Tab Position, and click the same two lines again: the second tab shares LKW1 and the other sizes.
Choose E flute in the Variables panel's Run View and both tabs, both slots, and the tray, follow the new T.
See also: Tuck Flap, Crease Offset, Packaging.