Louver Tool
Use the Louver Tool to put a row of louvers (vents pressed out of the sheet) in a flat pattern: each its lance, the cut it opens along, and its forming tool's outline, so the punch can be programmed and the part checked. As an Emboss it puts a row of embosses instead: ribs, rectangular embosses or round dimples. It is a tool of the sheet metal and HVAC trades.
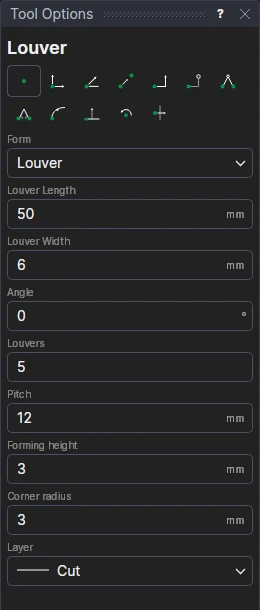
Usage
- Choose the Form: Louver, or Emboss.
- Fill in the Louver Length and Louver Width (the forming tool's size: a louver's ends are rounded to half the width), and the Angle the row is turned by (0 has the louvers' length along X).
- Fill in how many Louvers, and their Pitch: from one louver's centre to the next, across their length.
- Fill in the Forming height: how far each is pressed out of the sheet, more than 0 up (towards you), less than 0 down. With a height they are formed in 3D and in STEP (see Sheet metal in 3D); 0 draws them flat only.
- For an emboss, fill in the Corner radius: half the width rounds its ends (a rib); with the length the same as the width, a round dimple; less, a rectangular emboss with rounded corners.
- Choose the layer to cut the lances on (the Cut layer, to start with).
- Click* the middle of the row. The louvers are shown as you move.
An emboss has its outline on the Form layer and no lance. Each louver's outline goes on the Form layer, added if the drawing hasn't one (shown dashed, not plotted or cut); its lance is the straight of the outline's upper side, on the layer chosen.
It follows the drawing
The length, width, angle, count and pitch are kept in new labelled variables (LVL1, LVW1, LVA1, LVN1, LVP1; the forming height LVH1, an emboss's corner radius LVR1), and the louvers are drawn by a block on the point you marked: change LVN1 and the row grows or shrinks round its middle; move the point and it follows.
*Depending on the chosen snap mode, several clicks may be required to define the point parametrically. Read more about Snap Modes
See also: Slot, Sheet Metal.