Notch Tool
Use the Notch Tool to notch an edge where you click. Choose its Notch shape: a V or a U cut into the edge, a Square notch with rounded inner corners (glass and stone: a hinge, clamp or pipe notch), or a Slit - the sewing notch, a short line square to the seam line that marks where pieces match. Its button is Edge Notch for packaging, laser cutting, labels, gaskets and foam, Fitting Notch for glass and stone, and Notch for sewing and leather; each starts with its trade's shape.
Which kind for which trade
| Kind | The trade's own tool | A drawing for |
|---|---|---|
| V or U | Edge Notch Tool | packaging, laser cutting, labels, gaskets, foam |
| Square, rounded corners (or U) | Fitting Notch Tool | glass, stone and tile |
| Slit | Notch Tool | sewing, leather |
A drawing for one industry starts with its trade's kind, and the toolbar button has that kind's name; a General drawing (or Show All Tools) shows the button as the Notch tool. The kind you choose stays chosen for that drawing until you choose another. The Tool menu still lists each trade's tool by its own name. Each kind makes what its trade's tool always has made: the same lines, layers and variables.
A V, U or square notch splits the edge round it (the edge kept on the Construction layer, its pieces defined on it) and shares its width and depth (NTW1, NTD1); a slit leaves the seam line whole (NCH1).
Edge Notch Tool
Use the Edge Notch Tool to cut a V or U notch into an edge where you click it: a registration or folding notch on a blank, a relief in a gasket, a finger notch. It is a tool of packaging, laser cutting, labels, gaskets and foam.
Usage
- Choose the Notch shape: V (straight sides to a point) or U (straight sides and a round bottom as wide as the notch).
- Fill in the Notch width (across its mouth) and Notch depth (in from the edge). A U notch is at least half as deep as it is wide.
- Leave Into the shape ticked to cut into a closed outline (clear it to cut out of it). An edge of a closed outline that is already split (round a notch cut before) or drawn as separate lines counts as closed. An edge that is part of no closed outline is notched on the side you click.
- Click on the edge where the notch's middle goes.
The edge is split either side of the notch, as the Split Tool splits it, and the notch is drawn between the two split points on the edge's layer. It keeps its place along the edge as a share of its length, and the width and depth become variables (NTW1, NTD1) that the next notches share.
For a pattern piece's notches (a short line into the seam), use the Notch Tool.
See also: Bridge Tool, Industries and Tool Sets.
Fitting Notch Tool
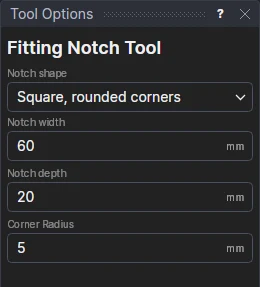
Use the Fitting Notch Tool to cut a notch into a panel's edge for a hinge, a clamp, a patch fitting or a pipe: square sided with its inner corners rounded (glass and stone crack from a square inside corner), or a U.
Usage
- Choose the Notch shape: Square, rounded corners or U.
- Fill in the Notch width (along the edge), the Notch depth (into the panel) and, for a square notch, the Corner radius of its inner corners.
- Click the edge where the notch's middle goes. Into a closed panel the notch goes inside it, whichever way its outline runs and on an edge already split round another notch too; along an edge that bounds no closed panel it goes on the side you click.
The edge is split either side of the notch (as the Split Tool splits it), the piece between taken out and the notch drawn in its place, on the edge's layer. The points either side are defined a fraction of the way along the edge, so the notch keeps its place as the edge changes; its width (NTW1), depth (NTD1) and radius (NTR1) are variables, and the notch a block on them.
For a die's small V or U nick in a cut, use the Edge Notch Tool.
See also: Corners Tool, Glass.
Notch Tool
Use the Notch Tool to mark notches on a pattern piece: short lines square to its seam line, so pieces are matched when they are sewn (one notch on the front, two on the back, by tradition).
Usage
- Fill in the notch's Length.
- Leave Into The Piece ticked for notches into the piece (to the left of a line that isn't closed); untick it for notches out from the sewing line into the allowance.
- Choose the layer to draw on.
- Click the seam line where a notch goes. The notch is shown as you move.
- Click again for the next notch.
Notches that follow the drawing
Each notch stays a fraction of the way along its line, square to it there. The length is kept in a new variable (NCH1), and the box then shows it, so the next notches share it.