Trace Tool
Use the Trace Tool to turn a raster image, such as a scanned logo or a sketch, into closed curves: a closed spline round each patch of colour, and round each hole in it. The curves are smooth where the image's edges are, keep their corners where the edges turn sharply, and stay within the tolerance you choose. You can then cut, offset or fill them like any other curve.
The curves are made of straight lines, circular arcs and Béziers: a side that is straight becomes a straight line, a round shape becomes arcs (a circle is four), a rounded corner becomes an arc that meets the sides either side of it smoothly, and only what is neither is fitted with Béziers. The pixels' steps are evened out before fitting, so round shapes come out round rather than lumpy. Small round shapes, such as dots, freckles and the highlights in an eye (up to about 12 pixels across), become true circles (four arcs), or ellipses where they are longer one way; so does any larger shape without corners that an ellipse fits within the tolerance.
The Trace Tool works best on artwork: logos, drawings, cartoons and scans of them. It can also trace a photograph into flat patches of colour, as a poster or a screen print does (see Photographs).
Usage
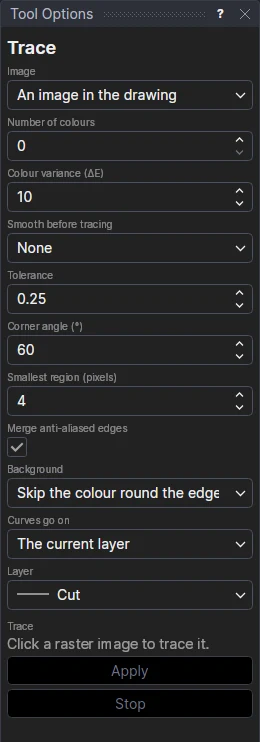
- Choose the Image:
- An image in the drawing: click a raster image placed with the Raster Image Tool. An image selected before you choose the tool is taken at once.
- An image file (placed first): choose the file and place it exactly as with the Raster Image Tool (its file, shape, encoding and layer options are shown). Once it is placed it is picked, and Image goes back to An image in the drawing.
- The image is traced straight away, in the background (on a large image you see how far it has got; Stop gives it up). The colours found are shown under Colours found, and the curves are drawn over the image. Change the options below and it is traced again.
- Choose where the Curves go on: The current layer (the Layer shown), or A layer for each colour.
- Click Apply to put the curves in the drawing. Press Escape to let go of the image, or click another one.
Options
| Option | What it does |
|---|---|
| Number of colours | How many colours the image is reduced to. The colours are chosen by clustering (k-means in the CIELAB colour space, the same every time), so two colours a smooth gradient runs between stay two colours, split in the gradient, and are never chained together through it. Use it for photographs and for artwork with gradients (12 is a good start for a photograph; fewer gives larger, simpler patches). 0 (the default) is automatic: the colours are found by the Colour variance instead. |
| Colour variance (ΔE) | Used while Number of colours is 0. How far apart two colours may be and still be traced as one colour, as ΔE in the CIELAB colour space (the straight-line CIE76 distance; about 2.3 is just noticeable, 10 is a small difference, 30 a clear one). Raise it to merge shades, such as a scan's uneven ink; lower it to keep near colours apart. 0 keeps every distinct colour apart. Small patches of a shade a little farther off (up to one and a half times the variance, plus 2) are joined to the patch beside them first, so a small detail split between near shades by smoothing or noise stays whole. |
| Smooth before tracing | None (the default, for artwork), Light or Strong. Smooths the image before it is split into colours while keeping its edges sharp (an edge-preserving bilateral filter), so a photograph's noise, grain and gentle shading become flat patches; Strong flattens textures such as wood grain, fabric and carpet too. The image itself is not changed. |
| Tolerance | The most a curve may stray from the edge of the colour it follows, in drawing units (0.25 mm or 0.01 in to start with). The image is traced in its own pixels, so the tolerance is worked out in pixels as the image is placed when you trace it: One pixel under Trace says how big a pixel is in the drawing, and Tolerance in the image's pixels what the tolerance comes to. It is never less than a quarter of a pixel (closer than that, a curve would only follow the pixels' steps): if your tolerance is smaller, that is said there, and a sharper (larger) image gives closer curves. Smaller follows the edge more closely with more pieces; larger gives fewer, smoother pieces. Straight sides, arcs and corners stay as they are whatever the tolerance, and a small shape (a dot, a thin stroke) is always followed within an eighth of its width (at least half a pixel), so it keeps its shape. |
| Corner angle (°) | Where the edge turns more sharply than this over a few pixels, a sharp corner is kept, at any tolerance (the curve meets there at the point where the straight edges either side meet, so a corner the pixels have blunted is sharp again). A stretch between corners that is straight within the tolerance becomes a straight line. 180 keeps no corners: every curve smooth. |
| Smallest region (pixels) | Patches of fewer pixels than this are specks: each is merged into the patch beside it nearest its colour. It is chosen from the image's size when you pick an image (4 pixels for an image up to about 900 pixels square, more for larger ones, at most 64), so single pixels and specks of noise go while small details such as the dot on an i stay; once you change it, your value is kept. 0 keeps every pixel. |
| Merge anti-aliased edges | Smoothed (anti-aliased) images have a pixel-wide fringe of in-between colours round each shape. Ticked, such fringes are shared out pixel by pixel to the colours either side of them, so they give no curves of their own. Clear it to keep hairlines a pixel wide. |
| Background | Skip the colour round the edge: the colour most common round the image's edge is the background, and the patches of it that reach the image's edge are not traced (the shapes on them are, with their holes). Patches of the same colour that the edge does not reach are traced like any other colour: a cream muzzle on a cream background, a highlight, the inside of a letter O. If the background skipped is more than 40% of a photograph, or of a picture whose background is shaded or busy, Trace warns that part of the subject may be lost: choose Trace every colour. Trace every colour: the background is traced too. Transparent pixels are never traced. |
| Curves go on | The current layer, or A layer for each colour: a layer named after the colour (Trace #E31E24), drawn in it, made if the drawing hasn't got it (traced again, the same layers are used). |
Photographs
When you pick an image, the Trace Tool looks at its pixels: a photograph has very many colours and little flat colour. If it looks like one, Trace says so and a Use photo settings button appears. It sets:
- Background: Trace every colour (a photograph has no plain background to skip),
- Number of colours: 12,
- Smooth before tracing: Light,
- Smallest region: larger, for the photograph's size (about 29 pixels for one 600 × 800), so specks of texture go.
The other options are left as they are. Then adjust: fewer colours (8) for a simpler, bolder result, more (16) for more detail; Strong smoothing to flatten wood grain, fabric and carpet. Each colour's patches are as solid as the photograph allows, but expect many curves: a photograph has far more edges than a logo. A photograph of a few megapixels is traced in a few seconds. For a simpler result with fewer curves, raise Smallest region (small patches, such as a carpet's pattern, then join the colour round them) or scale the photograph down first.
What is made
Each closed contour is one closed SPLINE of straight lines, circular arcs (ARC3, through three points) and cubic Béziers, written to the drawing file as any spline is, so it reads back and can be edited, exploded or offset. Arcs are written as arcs while the image's pixels are square in the drawing (it is placed in its own proportions, not stretched one way or skewed); otherwise a circle would not stay one, and each arc is written as the Bézier closest to it.
Every point of it is defined on the image's four corner points: the point at pixel (x, y) of an image W × H
pixels is LERP(LERP(P1,P2,u),LERP(P4,P3,u),v), where P1 to P4 are the image's bottom left, bottom right, top right
and top left corners, u = x / W and v = 1 − y / H (see LERP). So when you move, turn or
stretch the image by its corners, the curves go with it. They match the picture exactly while its corners make a
rectangle or parallelogram (Keep proportions and Rectangle always do); for a picture placed in perspective (Free), the
curves follow its corners in straight proportion, close to but not exactly on the picture.
Tracing is done once: the options are not kept as variables, and changing them afterwards does not change curves already made. To trace with other options, delete the curves and trace again. The image itself is left as it is: hide its layer, or delete it, when you no longer need it (its corner points stay, and the curves with them).
Example
To make a vinyl decal from a two-colour logo:
- Place the logo with the Raster Image Tool (or choose An image file (placed first) in the Trace Tool), 200 mm wide.
- With the Trace Tool, click the logo. Leave Background at Skip the colour round the edge, and set Curves go on to A layer for each colour.
- If two shades of one colour come out as two colours, raise Colour variance until Colours found shows one; if the curves are too wobbly, raise the Tolerance (say to 0.5 mm).
- Click Apply. Each colour's outlines are on their own layer, ready for the Colour Separation Tool and cutting colour by colour.
See also: Raster Image Tool, Spline Tool, Contour Cut Tool, Vinyl cutting.