Snap Modes
ParametrIQ CAD is a parametric CAD application: new points are defined in relation to existing points, so that when an existing point moves, the points built from it move too.
Snap modes are how you do this. A snap mode decides how a click turns into a point: either an existing point, or a new point placed relative to one or two existing points.
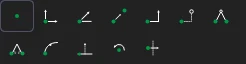
Choosing a snap mode
When you select a drawing tool, its snap modes appear at the top of Tool Options: buttons, in order Snap, Ortho, Angular (the Angle mode below), Tween, Two Point, Offset X and Y, Two Distances, Two Angles, Along an Element, Offset from a Line, Around a Centre and Mirror (hover over one to see its name). The current mode is highlighted; click another to change it. A tool shows only the modes it can use.
Every mode makes its point with an ordinary expression, shown in each section below, so the point follows the points, elements and variables it is made from.
Object snaps
As well as existing points, the cursor snaps to places on the elements where there may be no point yet. Each has its own marker:
| Snap | Where | The point made |
|---|---|---|
| Midpoint (triangle) | Half way along a line, arc or curve | ONELEMENT(@5,0.5) |
| End (square) | An end of a curve that has no point of its own there | ONELEMENT(@5,1) |
| Centre (circle and cross) | The centre of a circle, arc or ellipse | CENTEROF(@5) |
| Quadrant (diamond) | The right, top, left or bottom of a circle or arc (the ends of the axes of an ellipse) | QUADRANT(@5,1) |
| Intersection (X) | Where two elements cross | CROSSING(@5,@6,0) |
| Perpendicular (right angle) | The foot of a line at right angles from the last point marked | FOOT(@5,P3) |
| Tangent (circle on a line) | Where a line from the last point marked touches a circle or arc | TANGENT(@5,P3,0) |
| Part point | A point a placed part's lines are drawn on, or one of its part markers | @5.P3 |
When you click on one, a new point is made there, defined on the elements by the expression shown: never a position in space. So a line drawn to the middle of another stays at its middle when that one moves, and a line drawn tangent to a circle stays tangent. Where a point is already there (or nearer the cursor), that point is used instead. Hold Shift to snap to points only.
Object snaps work for the reference points of the other modes too: a point made Ortho from the middle of a line is made from a new point at that middle.
Tips for every mode
The reference point is the snap point nearest the cursor, and it is highlighted. Hold Shift to keep it while you move the cursor away.
Values by the cursor (while a value is being typed there, the mouse leaves the drawing alone: moving or clicking doesn't change or place what you are typing; Enter gives it, Esc goes back): as you move, a small box beside the cursor shows the values the new point needs (a distance, an angle) as the cursor measures them, and the drawing shows them too: the distance at the middle of the dotted line, and for an angle an arc from the horizontal. Just start typing to set a value: what you type goes into the box (the drawing takes the keyboard when the pointer is over it), and the preview follows it. Tab moves to the next value (an angle, then its distance), Enter or a click places the point, and Esc clears what you typed.
What you can type:
- a number, such as
25: it becomes a new variable (DIST1,ANG1…), so the drawing stays parametric; NAME=value, such asFLAP=25: a new variable with that name;- a variable or a formula, such as
W/2orL-2*T: used as it is, with no new variable (names are suggested as you type).
The Interactive panel says what each new variable is (
FLAP = 25); rename or change it later in the Variables panel. Something that can't be used is said in red under the box, and no point is placed until it is put right.- a number, such as
Clicking without typing: what a click does with a value you didn't type is set in Tool Options under Clicked Without Typing, for the drawing:
- Ask by the cursor (to begin with): the box asks for the value, the measured one already filled in and selected. Type over it or press Enter to keep it; Esc gives up the point.
- Use the measured value: the number the cursor measured, with no variable.
- Make a variable of it: a new variable of the measured number, without asking.
Round Distances To and Round Angles To (Degrees) round what the cursor measures to a step, such as
1,0.5or15degrees, so the preview moves in steps and clicking gives round numbers.0doesn't round. These are the drawing's#RVM,#RVRand#RVAvariables.Held values in Tool Options: a value filled in under the snap mode buttons is held: it fixes that part of every new point until you clear it. For example, fill in a distance and each new point is that far away; only the direction follows the cursor. A held value shows a lock, and its ✕ button clears it; by the cursor it is shown greyed, with the lock.
Lining up: as you move, the new point snaps into line with nearby points (the same X or the same Y), and a dotted guide line shows which point it has lined up with. The box then says in line: the value is the distance to that point, and follows it. Typing a value overrides the lining up.
Snap
Uses an existing point, for dot-to-dot drawing.
- Move the cursor near an existing point.
- Click. The tool uses that point, for example as the end of a line.
Ortho
Makes a new point straight across (horizontally) or straight up or down (vertically) from an existing point.
- Move the cursor near the reference point, and hold Shift to keep it.
- Move the cursor across or up/down. The new point goes in whichever direction is nearer the cursor, unless you choose a direction in Tool Options.
- Type the distance, or click (see Clicking without typing above).
Tool Options: Offset, which is the direction (optional) and the distance.
Angle
Makes a new point at an angle from an existing point.
- Move the cursor near the reference point, and hold Shift to keep it.
- Move the cursor. Without an angle filled in, the angle follows the cursor; with one, the new point slides along a line at that angle.
- Type the angle, Tab, and the distance (or leave either to the cursor), then press Enter or click.
Tool Options:
- Angle, in degrees, measured anticlockwise from the positive X axis.
- Offset, which is the distance, and how it is measured:
- Along: along the angled line.
- X: across only. The new point is on the line, this far across from the reference point.
- Y: up or down only. The new point is on the line, this far up or down from the reference point.
Tween
Makes a new point on the line between two existing points. It takes three clicks.
- Click the first point.
- Click the second point. A line between the two points is drawn.
- Move the cursor along the line (it snaps to the middle), then type the distance or click.
Tool Options: Distance Or Fraction, which sets how far the new point is from the first point:
- Distance: in drawing units, for example
25. - Fraction: of the way from the first point to the second, for example
0.5for the middle.
If you fill this in, the new point is shown at that position, and the third click places it.
Two-Point
Makes a new point whose X comes from one existing point and whose Y comes from another: for example, level with the top of one shape and in line with the side of another. It takes two clicks.
- Move the cursor near the first point and across to where the new point should be. Type the horizontal distance or click. The new point will be on the vertical line now drawn.
- Move the cursor near the second point and up or down along that line. Type the vertical distance or click.
Tool Options:
- Horizontal Distance From First Point: left or right (optional), and the distance.
- Vertical Distance From Second Point: up or down (optional), and the distance.
The status bar tells you which point to click next.
Offset X and Y
Makes a new point a distance across and a distance up from an existing point, as P3+[DX1,DY1].
- Move the cursor near the reference point, and hold Shift to keep it.
- Move the cursor to where the new point should be. Dotted lines show the distance across and the distance up.
- Type the distance across, Tab, and the distance up (or leave either to the cursor), then press Enter or click.
Tool Options: Across (X) and Up (Y). Left and down are negative.
Two Distances
Makes a new point a distance from each of two existing points (where two circles round them cross), as
TRIANGULATE(P1,P2,DIST1,DIST2,1). It takes three clicks.
- Click the first point.
- Click the second point.
- Move the cursor to the side of the line between them that the new point is on. Type the distance from the first point, Tab, and the distance from the second, then press Enter or click.
Tool Options: Distance From First Point and Distance From Second Point. If the distances are too short to reach, there is no point. See TRIANGULATE.
Two Angles
Makes a new point where a line at an angle from one existing point crosses a line at an angle from another, as
RAYCROSSING(P1,ANG1,P2,ANG2). It takes three clicks.
- Click the first point.
- Click the second point.
- Move the cursor to where the new point should be. Type the angle from the first point, Tab, and the angle from the second, then press Enter or click.
Tool Options: Angle From First Point and Angle From Second Point, in degrees anticlockwise from the positive X axis. See RAYCROSSING.
Along an Element
Makes a new point a distance along a line, arc or curve, measured along it from its nearer end, as
ALONGELEMENT(@5,DIST1) or, from the far end, ALONGELEMENT(@5,FROMEND(DIST1)).
- Move the cursor onto the element. The end it is measured from is marked: whichever is nearer the cursor.
- Type the distance, or click.
Tool Options: Distance Along (From The Nearer End). See ALONGELEMENT.
Offset from a Line
Makes a new point a distance along a line and a distance out from it at right angles, as
POLAR(ALONG(P1,P2,DIST1),RTOD(ANGLE(P2-P1))+90,OFF1). If the line is moved or turned, the point goes with it.
- Move the cursor over the line. It stays chosen as you move away (pass over another line to change it).
- Move the cursor to where the new point should be. Dotted lines show the distance along and the distance out.
- Type the distance along, Tab, and the distance out, then press Enter or click.
Tool Options: Distance Along The Line (from its start) and Distance Out (Left of the Line): left as you look from the line's start to its end; negative is to the right.
Around a Centre
Makes a new point by turning an existing point round a centre, as P2*ROTATE(P1,ANG1). It takes three clicks.
- Click the centre.
- Click the point to turn.
- Move the cursor round. An arc shows the turn. Type the angle, or click.
Tool Options: Angle Round The Centre, in degrees: anticlockwise is positive. See ROTATE.
Mirror
Makes a new point that is the reflection of an existing point in the line through two others, as
P3*MIRROR(P1,P2). It takes three clicks.
- Click the first point on the mirror line.
- Click the second point on it. The line is drawn.
- Move the cursor near the point to reflect: its reflection is shown. Click.
There are no values to type. See MIRROR.