Finger Joint Tool
Use the Finger Joint Tool to turn an edge into a finger (box) joint: fingers along the edge, and slots between them as deep as the material is thick, so two panels cut from sheet slot together at a corner.
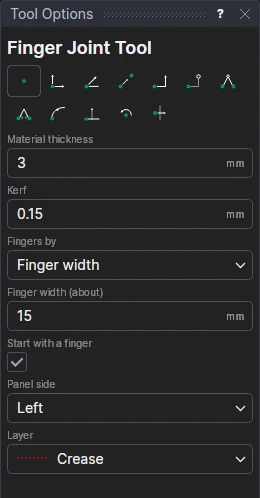
Usage
- Fill in the Material Thickness: how deep the slots are.
- Fill in the Kerf: what the beam burns away. Each finger is made that much wider and each slot that much narrower, so the joint is tight. 0 for none. Test it on your machine.
- Choose how many Fingers By: Finger Width (as many as fit at about that width, always an odd number, so the edge starts and ends the same way), or a Count.
- Leave Start With A Finger ticked for one panel; untick it for the panel it joins, so its slots meet the first's fingers.
- Choose the Panel Side: which side of the edge the panel is, going from its first point to its second. The slots are cut into it.
- Choose the layer to draw on.
- Mark* one end of the edge (a panel's corner), then the other. The fingers are shown as you move.
A straight line already drawn between the two points is moved to the Construction layer: the fingers take its place.
Joints that follow the drawing
The fingers are a FOR block on the two points and on new variables: the thickness (FJT1), the kerf (FJK1), the finger width (FJW1) and the count (FJN1: worked out from the width and the edge's length, or the count you gave). Move a corner and the fingers fit the new edge; change FJT1 or FJK1 and every joint changes. The thickness, kerf and width boxes then show the variables, so the next edges share them.
The fingers and slots always add up to the edge's length: the first and last are half a kerf narrower or wider, so the corners stay where they are.
*Depending on the chosen snap mode, several clicks may be required to define the point parametrically. Read more about Snap Modes