Pocket Tool
Use the Pocket Tool to cut a pocket (a cavity) in a foam insert for an item to sit in. It has two Kinds: a pocket of a size - a rectangle with rounded corners or a circle, with finger pulls - marked by its centre, or a shadow pocket round an outline, the clearance outside an item's traced or imported outline.
Which kind for which trade
| Kind | The trade's own tool | A drawing for |
|---|---|---|
| Pocket of a size | Pocket Tool | foam |
| Shadow pocket round an outline | Shadow Pocket Tool | foam |
A drawing for one industry starts with its trade's kind, and the toolbar button has that kind's name; a General drawing (or Show All Tools) shows the button as the Pocket tool. The kind you choose stays chosen for that drawing until you choose another. The Tool menu still lists each trade's tool by its own name. Each kind makes what its trade's tool always has made: the same lines, layers and variables.
Pocket Tool
Use the Pocket Tool to cut a pocket (a cavity) in a foam insert for an item to sit in: a rectangle with rounded corners or a circle, with finger pulls - half-round scoops on its sides - so the item can be lifted out.
Usage
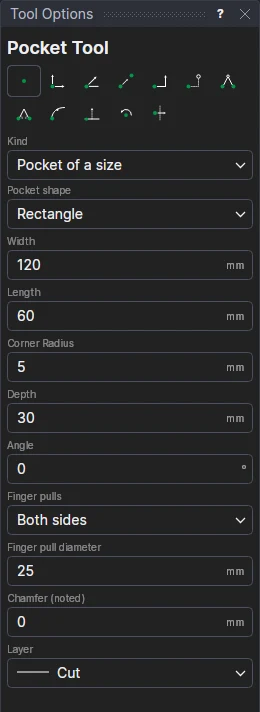
- Choose the Pocket shape: Rectangle or Circle.
- Fill in its Width (a circle's diameter) and, for a rectangle, its Length and Corner radius: the item's size and the clearance it needs.
- Fill in the Depth from the top of the insert, and the Angle to turn it by.
- Choose the Finger pulls: none, one side or both sides (the sides along the width), and the Finger pull diameter.
- To note a chamfer round the pocket's top edge for the router, fill in Chamfer (noted) (0: none).
- Without a layer stack, choose the Layer to cut it on.
- Click* the pocket's centre. The pocket is shown at the pointer as you move.
The depth (and any chamfer) is noted in the pocket on the Dimension layer.
Pockets through a layer stack
When the drawing has a layer stack (made with the Foam Layers Tool), the pocket is drawn in each sheet its depth reaches, in the same place on each:
- cut through (on the cut layer) the sheets it goes right through, or whose bottom it ends at;
- on the Partial cut layer, with the depth into the sheet noted, in the sheet it ends in part-way: a pocket to rout to that depth;
- not at all in the sheets below it.
A 45 deep pocket in a stack of 30, 30 and 10 goes through the top sheet and is routed 15 into the middle one. Change its depth (POCD1) to 70 and it goes through all three.
Pockets that follow their sizes
Every size is a variable: the width (POCW1), length (POCL1), corner radius (POCR1), depth (POCD1), angle (POCA1), finger pull (POCF1) and chamfer (POCC1). The pocket is a block on them and its centre, so changing one reshapes it; the options then show them, so the next pockets share them.
*Depending on the chosen snap mode, several clicks may be required to define the point parametrically. Read more about Snap Modes
See also: Shadow Pocket Tool, Foam and Inserts.
Shadow Pocket Tool
Use the Shadow Pocket Tool to cut a pocket shaped like the item itself - a tool, an instrument, a part - for a shadow board or a case insert: click the item's outline (traced over a photograph, or imported from a DXF), and the pocket is cut the clearance outside it all round.
Usage
- Draw or import the item's outline as one closed element (join its pieces with the Join Tool).
- Fill in the Clearance (how far outside the outline the pocket is cut) and the Depth.
- Choose the Layer to cut it on.
- Click the outline. The pocket is shown as you move over it.
The pocket is an OFFSET of the outline, which is moved to the Construction layer; its depth is noted at its middle on the Dimension layer. The clearance and depth are variables (SHC1, SHD1): the pocket follows the outline and the clearance. Add finger holes with the Circle Tool over its edge.
See also: Pocket Tool, Foam and Inserts.