Tiling Tool
Use the Tiling Tool (panelling) for a vinyl design larger than the roll: a vehicle's side, a shop front, a wall graphic. The design is split into panels as wide as the roll's usable width, each overlapping the next so the joins don't show a gap, and each panel's part is laid out on its own, ready to cut one panel at a time.
Usage
- Select the design: click it, drag a box round it, or hold Shift to add to what is selected.
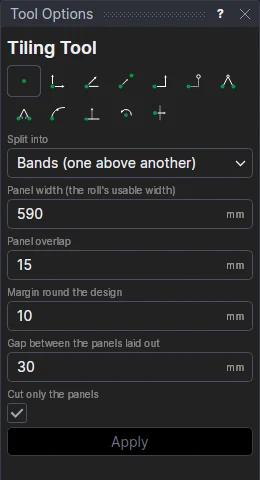
- Choose the Split into: Bands (one above another) or Columns (side by side).
- Fill in the Panel width (the roll's usable width), the Panel overlap, the Margin round the design and the Gap between the panels laid out.
- Leave Cut only the panels on to move the design itself to the Construction layer, so only the panels are cut.
- Click Apply.
Over the design, each panel's outline and number (1/3, 2/3 …) is drawn on the Tiles layer (not cut). To the right of it, each panel's part of the design is laid out a gap apart, with its edges and alignment marks: crosses cut in its margins, in the middle of the overlaps, that lie on each other when the panels are put together.
Panels that follow the design
It is all one block, on the design's extent (EXTENTMIN) and CLIPTO. The sizes are variables (TILEW1, TILEO1, TILEM1, TILEG1), and the number of panels (TILEN1) is worked out from them: change the design or a size, and the panels are made again.
See also: Colour Separation Tool, Vinyl cutting.